Configuring and Customizing Plone "Through The Web"#
Todo
Update for Plone 6!
Add Volto screenshots for control panels
The Control Panel#
The most important parts of Plone can be configured in the control panel.
Click on the portrait/username in the toolbar
Click Site Setup
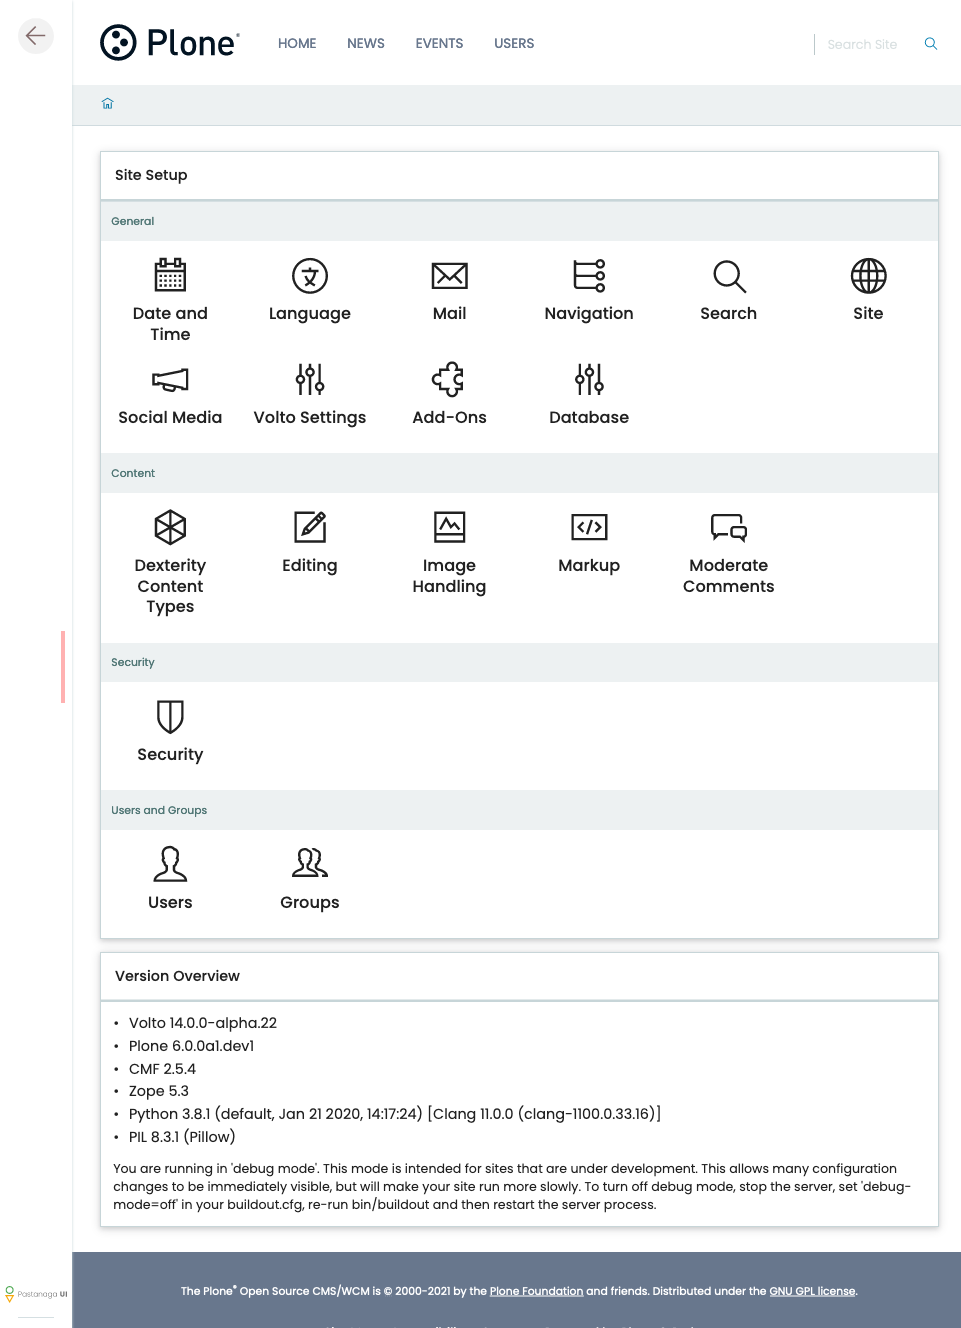
Site Setup#
We'll explain every page and mention some of the actions you can perform here.
Note
Not all control panels are available in Volto. Some are not useful in Volto, e.g. TinyMCE since that editor is not used here. Other control panels, e.g. Content Rules still need to be implemented.
General#
Add-ons
Database
Date and Time
Language
Mail
Navigation
Search
Site
Social Media
Undo
URL Management
Volto Settings
The following control panels are so far only available in the backend:
Actions
Discussion
Syndication
Theming
TinyMCE
Content#
Content Types
Editing
Image Handling
Markup
Moderate Comments
The following control panels are so far only available in the backend:
Content Settings
Users#
Editing users
Security#
Security
The following control panels are so far only available in the backend:
Errors
HTML Filtering
Advanced#
The following control panels are so far only available in the backend:
Caching
Configuration Registry
Maintenance
Management Interface
Resource Registries
Below the links you will find information on your Plone, Zope and Python Versions and an indicator as to whether you're running in production or development mode.
Change the logo#
Note
This only changes the logo used in Plone Classic (the backend) and does not change the logo in Volto. The Logo in Volto is changed in next chapter Customizing Volto Components.
Let's change the logo.
Download a logo: https://www.starzel.de/plone-tutorial/logo.png
Upload the Logo.
The view of the homepage with the customized logo.#
Portlets#
Note
Portlets only exist in the classic frontend. Volto has no equivalent so far. The discussion about this is ongoing :)
In the toolbar under the Portlets section, you can open the configuration for the different places where you can have portlets.
UI fit for smart content editors
Various types
Portlet configuration is inherited
Managing
Ordering/weighting
The future: may be replaced by tiles
@@manage-portlets
Example:
Add a static portlet "Sponsors" on the right side.
Remove the news portlet and add a new one on the left side.
Go to the training folder: http://localhost:8080/Plone/training and click Manage portlets
Add a static portlet. "Featured training: Become a Plone-Rockstar at Mastering Plone!"
Use the toolbar to configure the portlets of the footer:
Hide the portlets "Footer" and "Colophon".
Add a Static text portlet and enter "Copyright 2019 by Plone Community".
Use to add a real © sign.
You could turn that into a link to a copyright page later.
Viewlets#
Note
Viewlets only exist in the classic frontend. In Volto they are replaced by react components and have no user-interface to move or show/hide them. How to customize these elements in Volto is discussed in next chapter Customizing Volto Components.
Portlets save data, Viewlets usually don't. Viewlets are often used for UI-Elements and have no nice UI to customize them.
@@manage-viewletsViewlets have no nice UI
Not aimed at content editors
Not locally addable, no configurable inheritance.
Usually global (depends on code)
Will be replaced by tiles?
The code is much simpler (we'll create one tomorrow).
Live in viewlet managers, can be nested (by adding a viewlet that contains a viewlet manager).
TTW reordering only within the same viewlet manager.
The code decides when it is shown and what it shows.
ZMI (Zope Management Interface)#
Go to http://localhost:8080/Plone/manage
Zope is the foundation of Plone. Here you can access the inner workings of Zope and Plone alike.
Note
Here you can easily break your site so you should know what you are doing!
We only cover three parts of customization in the ZMI now. Later on when we added our own code we'll come back to the ZMI and will look for it.
At some point you'll have to learn what all those objects are about. But not today.
Actions (portal_actions)#
Actions are mostly links. But really flexible links.
Actions are configurable TTW (Through-The-Web) and through code.
These actions are usually iterated over in viewlets and displayed.
Examples:
Links in the Footer (
site_actions)Actions Dropdown (
object_buttons)
Actions have properties like:
description
url
i18n-domain
condition
permissions
site_actions#
These are the links at the bottom of the page:
Site Map
Accessibility
Contact
Site Setup
We want a new link to legal information, called "Imprint".
Go to
site_actions(we know that because we checked in@@manage-viewlets)Add a CMF Action
imprintSet URL to
string:${portal_url}/imprintLeave condition empty
Set permission to
ViewSave
explain
Check if the link is on the page
Create new Document "Imprint" and publish
portal_view_customizations#
Note
This feature has no effect for Volto since it allows customzing server-side rendered templates. How to customize the equivalent views in Volto is discussed in next chapter Customizing Volto Components.
Further tools in the ZMI#
There are many more notable items in the ZMI. We'll visit some of them later.
acl_users
error_log
portal_setup
portal_workflow
portal_catalog
Summary#
You can configure and customize a lot in Plone through the web. The most important options are accessible in the Plone control panel but some are hidden away in the ZMI. The amount and presentation of information may be overwhelming and the differences between the Volto frontend and the Classic Plone frontend adds even more complexity. Don't worry, you'll get the hang of it through practice.